Cleaning a swimming pool is more than simply scooping the surface and washing it to remove stains and the following is a list of how it can be cleaned in the best way possible. Chemical water testing is one of the most important of all pool maintenance practices. This is important to ensure that the chemical combination is perfect and this makes the swimming pool safe for swimmers and the swimming pool constructed lasting long. As this guide aims to provide you with all the information needed to test pool water, we will provide you with detailed information on how you can test the water effectively. Therefore, so that you are not stopped from having the best bathing experience within the swimming pool, use these procedures.
Table of Contents
How Testing Helps in the Care of Swimming Pool Water
But first, let us see why it is vital to test pool water as the expertise on how to do it is given. Water in a pool is more of a solution that entails a combination of many chemicals. Improper levels of chemicals like chlorine, pH, alkalinity, and calcium hardness can lead to several issues, including Improper levels of chemicals like chlorine, pH, alkalinity, and calcium hardness can lead to several issues, including:
Health Risks: Risks of skin rash, eye irritation, and sometimes difficulty in breathing are realized when chemical levels are not balanced, for swimmers.
Algae Growth: If it is out of balance algae thrives making the water green and slippery to the base of the pool.
Equipment Damage: Unequal distribution of water causes the enhancement of rusting the equipment and other surfaces of the pool causing high costs to be incurred in repairing them.


Poor Water Quality: Water in murky, cloudy, or foul smell is not perceptively appealing and shows that the water facility has not been well maintained.
It is advisable to test from time to time so that you can be able to rectify the chemical imbalance to make your pool a safe place to be in.
Tools You Will Need
So, let’s meet with the instruments that you will require to test your pool water accurately. These include:
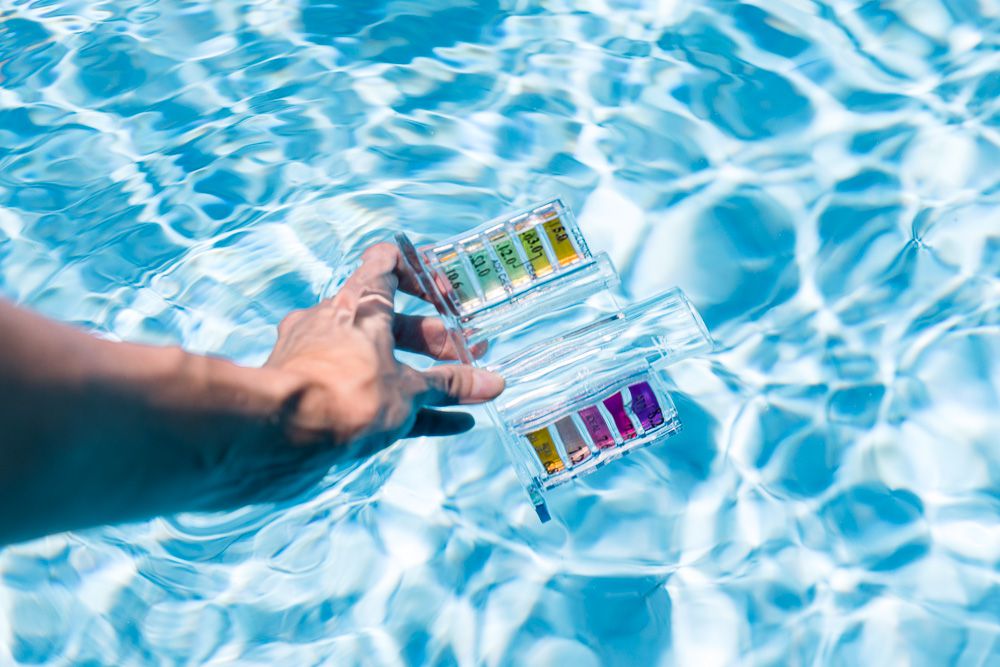
Test Strips: These are convenient to use and give relatively fast results. They test for several parameters including pH, chlorine, and alkalinity.
Liquid Test Kits: Compared to the test strips, these kits are more accurate and contain reagents that will turn a different color once mixed with pool water.
Digital Testers: Digital testers give very accurate readings of the pH level, chlorine level, and other related factors for perfect water testing.
Knowing the procedure of the water inspection of swimming pools makes it easier to test the water in the swimming pool.
Step 1: Test a Water Sample
To obtain this value add a sample of water collected from a position that is 18 inches beneath the water’s surface. Minimize hauling water from the skimmer or any part of the return jets since such water may not be rela- tively indicative of the pool water chemistry.
Step 2: To test for Chlorine and pH Levels
Using Test Strips:
Submerge the test strip in the water sample and quickly take it out.
Horizontally position the strip and let the colors build up for the required time, typically 15 seconds.
On the strip, you compare the colors to this chart and in turn, see the amount of chlorine needed and the pH level.
Using Liquid Test Kits:
Place a designated amount of your water sample into the test kit’s comparator tubes to the line provided.
Incubate each tube with the required drops of reagents, one for chlorine and one for pH.
Screw the tube and then swirl it to dilute the solution.
Look at the color of the water in each tube and then at the color standard placed at the center of the comparator.
Desirable values of chlorine should be in the range of 1. 0 to 3. parts per million and pH should be 7. 2 and 7. 6.
Step 3: This test is specifically for total alkalinity. Another name for it is called Morhra test.
Total alkalinity is necessary to maintain the stability of pH since the changes which can impact water quality.
Using Test Strips:
The test strip that measures alkalinity has to be dipped in the solution being tested.
In the context of comparing the color of the developed prints to the color/multi-color chart, one has to jot down certain points as follows:
Using Liquid Test Kits:
About traditionally prescribed droppers, drop in the water sample in the test kit the required number of drops of the alkalinity reagent.
Squash and blend the color change to the chart as provided on the next page.
It is recommended that total alkalinity within the water shall be in the range of 80 – 120 ppm.
Step 4: This test is useful to determine the calcium hardness of pool water.
Calcium hardness mostly influences the ability of the river to clarify and help avoid scaling or corrosion.
Using Test Strips:
A test strip that will be used is the one that determines calcium hardness.
Submerge the strip into the water sample solution and wait for some time then refer to the color chart.
Using Liquid Test Kits:
Pour the calcium hardness reagent into a water sample in the test kit.
Stir it as well as compare the obtained color with the one described on the chart.
The desirable calcium hardness range is 200-400 ppm.
Step 5: These Three Need to Be Reduced To Adjust Chemical Levels
Due to the results of the tests you may have to change the chemical content present in your pool. Here’s how:
Chlorine: If chlorine is too low use chlorine granules or tablets Solutions with high chlorine concentration are shock treatments. If overly high, wait for the chemicals to subdue or partially empty the pool and then fill it up.
pH: These range from increasing the pH of the solution by adding soda ash commonly known as sodium carbonate. To thus reduce the pH, use muriatic acid or sodium bisulfate.
Alkalinity: To increase the scale, a forming agent based on sodium is added in the form of baking soda. To increase, scatter muriatic acid.
Calcium Hardness: For increasing the calcium hardness calcium chloride should be added. To reduce, partially empty and fill the swimming pool with less hard water.
Tips for Accurate Testing
Test Weekly: To achieve a proper balance of water chemistry, the testing should be done frequently, preferably once a week.
Test After Heavy Use or Rain: Tend the water because different events such as pool parties, storm, or heavy rainfall may affect the results of the chemical test.
Follow Instructions: Ensure that you follow all the particulars given in the packaging of your test kits or strips to get the best results.
Record Results: This will enable one to log the results of the tests carried out hence making it easier to identify trends and make corrections.
How to Clear Pool Water
Using a pool cleaning robot is a great way to clean pool water. This type of robot includes vortex cleaning and vacuuming, which can filter the water and help you save a lot of time. Beatbot AquaSense Pro is recommended as it includes automatic clarifying,smart return,water surface cleaning, 5 cleaning modes, cordless operation, and up to 9 hours of battery life.
Conclusion
Checking water quality is one of the most crucial parts of pool maintenance, which preserves the health and comfort of users. Consequently, performing a routine monitoring process from time to time will help to avoid some frequent problems like algae growth, possible equipment damage, and even health risks. Once a swimmer knows what to do and what not to do, it becomes very easy to maintain water in a swimming pool.
Visit Beatbot for more tips and high-quality pool maintenance products All Rights Reserved. Our products in pool care will assist you to keep your pool clean, hence enjoying your pool more time with your family and friends. Swimming has never been this fun and safe. Try it with Beatbot today.