Tufting has evolved from a traditional craft into a sophisticated fine art form, with artists worldwide transforming blank canvases into textured masterpieces that rival painted works in complexity and emotion. Yet translating intricate sketches—those delicate florals, geometric mandalas, or portrait details—onto fabric backing presents a unique challenge. The core problem? Not all tufting guns are created equal for detailed work. While basic models can handle simple shapes and bold color blocks, rendering fine lines, smooth curves, and nuanced shading demands a tool engineered for precision. Understanding what a tufting gun is—essentially a motorized device that rapidly punches yarn through fabric to create pile surfaces—is just the starting point. For professional designers, the real question becomes: which gun offers the control, consistency, and technical capabilities to honor your artistic vision? This article guides you through selecting the perfect tufting gun to execute intricate artwork with confidence, ensuring every stitch serves your creative intent rather than fighting against it.
Table of Contents
Understanding the Tool: What is a Tufting Gun and Why It Matters for Detail
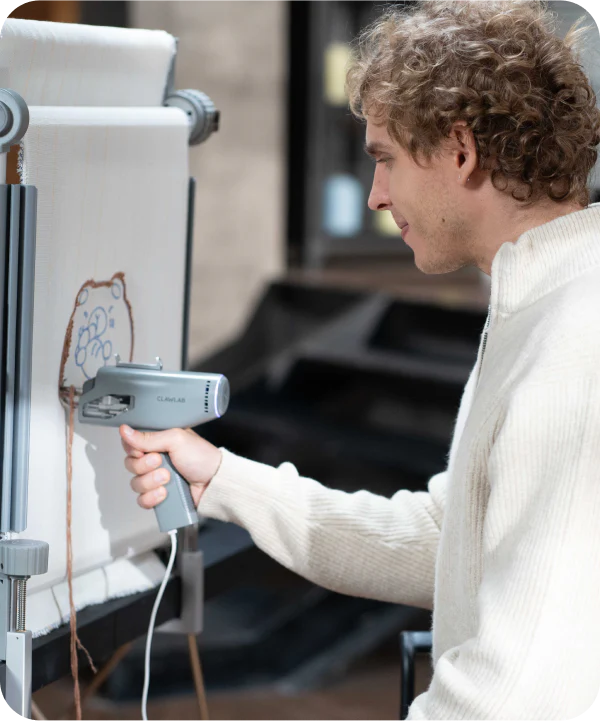
A tufting gun is a motorized handheld device that rapidly drives yarn through stretched fabric backing, creating either continuous loops (loop-pile) or trimmed strands (cut-pile) depending on the model. The mechanism works by feeding yarn through a hollow needle that penetrates the fabric at high speed—typically 30 to 40 stitches per second—while the operator guides the tool across their design. This automated punching eliminates the repetitive hand-cramping motion of traditional needle-punch methods, making large-scale textile art physically feasible. However, for intricate patterns featuring delicate line work or complex color transitions, the distinction between a basic tufting gun and a precision-engineered model becomes immediately apparent. Hand-tufting offers unmatched control for microscopic details but proves impractically slow for anything beyond small accent areas. The ideal tufting gun bridges this gap, delivering machine efficiency without sacrificing the nuanced control artists need for tight curves, gradient shading, and fine typography. Critical factors include adjustable pile height for dimensional effects, minimal vibration during direction changes to prevent wobbly lines, and compatibility with fine-gauge yarns that enable sharper definition. For serious artists, the gun must function as a natural extension of their drawing hand—responsive, predictable, and capable of honoring every intentional mark in the original design rather than imposing the tool’s limitations onto the artwork.
Key Features for Precision: Evaluating Tufting Tools for Detailed Patterns
When your design demands crisp edges on a botanical illustration or smooth gradients in a portrait, your tufting gun’s specifications become non-negotiable. The difference between a frustrating struggle and effortless execution lies in three core technical areas that directly impact your ability to render complexity.
Motor Power and Speed Control
Variable speed control transforms a tufting gun from a blunt instrument into a precision tool. A robust motor delivering consistent torque ensures the needle punches through densely worked areas without stalling, maintaining uniform pile height across color-blocked sections. More critically, the ability to dial down speed gives you command over challenging passages—navigating the tight radius of a spiral motif or following the delicate curve of a face contour requires deliberate, slower stitching. Fixed-speed guns force you to physically slow your hand movement, which often results in uneven tension and wobbly lines. Look for models offering at least three distinct speed settings, allowing you to match the tool’s rhythm to each section’s demands rather than fighting against a single relentless pace.
Needle and Foot Design
Needle gauge directly determines the fineness of your line work. Thicker needles accommodate bulky yarns but create wider puncture holes, making delicate details appear chunky and imprecise. For intricate patterns, a finer needle (typically 3mm or smaller) allows use of lightweight yarns that produce sharper definition between color zones. Equally important is the foot—the metal plate surrounding the needle that contacts your fabric. A compact, narrow foot design enables you to maneuver into tight corners and trace sharp angles without the gun’s body obstructing your view of the design line. Wider feet, common on industrial models, excel at filling large background areas but become clumsy when rendering fine typography or geometric precision work where every millimeter counts.


The Critical Role of Illuminated Feedback
Working on a vertical frame with layers of colored yarn creates inevitable shadows, particularly in recessed areas where previous tufting blocks ambient light. Built-in LED illumination positioned near the needle point solves this visibility crisis by casting focused light exactly where the next stitch will land. This feature proves transformative when executing intricate tufting patterns that require constant color changes—you can clearly see the boundary between your completed navy section and the adjacent cream area you’re about to begin, preventing accidental overlap that would muddy the design. Beyond preventing errors, illuminated feedback reduces eye strain during marathon work sessions, allowing you to maintain the intense focus detailed artwork demands. Some artists dismiss lighting as a luxury, but professionals working on commission-level pieces recognize it as essential infrastructure. The confidence to place each stitch accurately, even in shadowed zones, directly translates to cleaner results and fewer time-consuming corrections.
Practical Solutions: A Step-by-Step Guide to Selecting Your Gun
Moving from technical specifications to your workbench requires a systematic approach that aligns tool capabilities with your actual creative demands. Rather than chasing the most expensive model or getting overwhelmed by marketing jargon, follow this structured decision framework to identify the tufting gun that serves your specific artistic practice.
Step 1: Audit Your Project Requirements
Begin by analyzing your last five completed pieces or upcoming commissions. What yarn weight dominates your palette—fine embroidery-weight threads for photorealistic portraits, or medium-weight wool for stylized botanicals? Measure your typical project scale: are you creating 12-inch decorative pillows or room-sized wall installations? Document the most challenging elements in your recurring tufting patterns—do you frequently render tight spirals, sharp typographic serifs, or gradient transitions requiring dozens of color changes? This honest inventory reveals whether you need a lightweight gun for marathon detail sessions or a heavy-duty model that powers through dense, large-format work without overheating.
Step 2: Prioritize Your Feature Wishlist
With your project profile clear, rank the features discussed earlier according to your non-negotiables versus nice-to-haves. If you specialize in shadowy, dimensional landscapes with deep pile variations, adjustable speed control and pile height settings become mandatory. Artists working near windows with ample natural light might deprioritize illuminated feedback, while those in basement studios should consider it essential. Budget constraints force trade-offs—a compact, portable tufting gun sacrifices some motor power but gains maneuverability for artists attending workshops or working in shared studios. Write your top three must-have features before researching specific models to avoid feature creep that inflates costs without improving your actual results.


Step 3: Hands-On Testing and Research
Seek video reviews from artists executing work similar to yours in complexity, not just unboxing footage or basic demonstrations. Pay attention to how the gun handles direction changes mid-stitch and whether the operator struggles with specific techniques you use frequently. Cross-reference manufacturer specifications for motor wattage, needle gauge options, and warranty terms that indicate build quality. If local makerspaces or tufting studios offer equipment trials, test candidate models on a sample of your actual design—a five-minute hands-on session reveals ergonomic issues and control limitations no spec sheet can communicate. Note how the gun feels after ten minutes of continuous use; discomfort during testing multiplies exponentially during a four-hour work session on deadline. Many artists find that brands like Clawlab, which focus specifically on tufting equipment, offer detailed specifications and user communities that provide valuable real-world insights into how their tools perform during extended detailed work.
Beyond the Gun: Essential Tufting Tools for Detailed Patterns
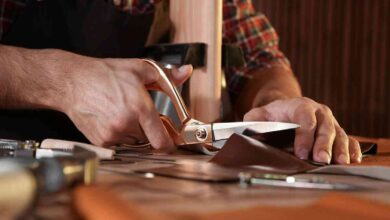
Even the most sophisticated tufting gun cannot deliver gallery-worthy results without a supporting cast of specialized tools designed for precision work. Professional-grade fabric scissors with micro-serrated blades become indispensable for sculpting pile height variations—trimming a portrait’s shadowed cheekbone to create dimensional depth, or carving crisp edges where a floral petal meets its stem. Fine-point fabric markers in multiple colors allow accurate pattern transfer onto backing material, ensuring your intricate design translates without distortion from paper to stretched canvas. A sturdy tufting frame with ratchet-style clamps maintains consistent fabric tension across the entire work surface, preventing the sagging that causes uneven pile height in detailed sections. Yarn guides or tension rings keep multiple thread colors organized during frequent changes, eliminating the workflow disruption of tangled skeins when transitioning between a portrait’s skin tones. While your tufting gun executes the vision, these complementary tools create the controlled environment where precision becomes possible. Together, they form an integrated system where each element supports the others—sharp scissors correct what the gun places, stable frames ensure what you tuft stays true, and organized materials let you focus on artistry rather than logistics. Investing in this complete toolkit transforms technical capability into consistent, professional results.

Making the Right Choice for Your Artistic Vision
Choosing a tufting gun for intricate artwork ultimately comes down to aligning technical specifications with your artistic demands. The right tool doesn’t just execute stitches—it becomes a responsive extension of your creative vision, capable of honoring every subtle curve, gradient transition, and fine detail your designs require. Throughout this guide, we’ve established that three features form the foundation of precision work: variable speed control for deliberate pacing through complex passages, optimized needle and foot design for navigating tight spaces with fine yarns, and illuminated feedback that ensures accurate stitch placement even in shadowed work areas. Beyond these core capabilities, remember that your tufting gun operates within an ecosystem of complementary tools and techniques. Investing thoughtful time in your selection process—auditing your project requirements, prioritizing features that match your actual workflow, and researching real-world performance—pays dividends in every piece you create. With the perfect gun in hand, those intricate tufting patterns that once seemed impossibly ambitious become achievable milestones. The right equipment doesn’t guarantee masterpieces, but it removes technical barriers that stand between your imagination and the textured, dimensional artwork waiting to emerge from your studio.
-
-
-
-

-

-