
If you love arts and crafts, you know that it requires tons of stuff like papers, colored markers, glue, etc. You are most likely to own tons of tools and materials as you go into more tedious and challenging crafting activities. This will mean that you will need to find a space to store them at home.
Organizing your craft supplies may be challenging at first, but it will become fun in the long run. There are numerous storage options you can count on to store all your stuff. Whatever type of craft storage cabinet or organizer you purchase will help you transform your arts and crafts area into a neat and organized one. Hence, read on to know a few helpful ways how you can organize your craft supplies at home:
- Divide Your Tools and Materials Into Categories
One of the first things you should do to organize your craft materials is to create different categories of items you have. If you are having trouble thinking of some, then you can base your supplies according to the type of item or craft you have, like markers, yarns, pens, paints, threads, brushes, needles, papers, and the like. Remember that you need to have a significant amount of supplies for every category to maximize the box space or the storage you will use. Also, put items together that you regularly use, so they will be in the same bin or organizer, and you won’t have a hard time looking for them.
- Opt For Small Drawers for Tiny Materials
If you work on small crafts, you must also have storage for them. Tiny drawers or containers are what you need when you are into beads, glitters, needles, and other tiny stuff. You can buy stackable craft organizer drawers to organize your supplies separately from the bigger ones. These small drawers help you sort things out easily because they are hard to find with their size.
- Label Your Storage
Labeling is one of the most effective ways to organize craft supplies at home. It allows you to list every item and mark them with what’s inside each storage. You can either print the labels on sticker papers or write them down using chalk markers or pens to organize your stuff properly. Additionally, labels are a huge help in keeping your space organized, for there is no reason to forget the names of your supplies, and you can easily look for them when needed.
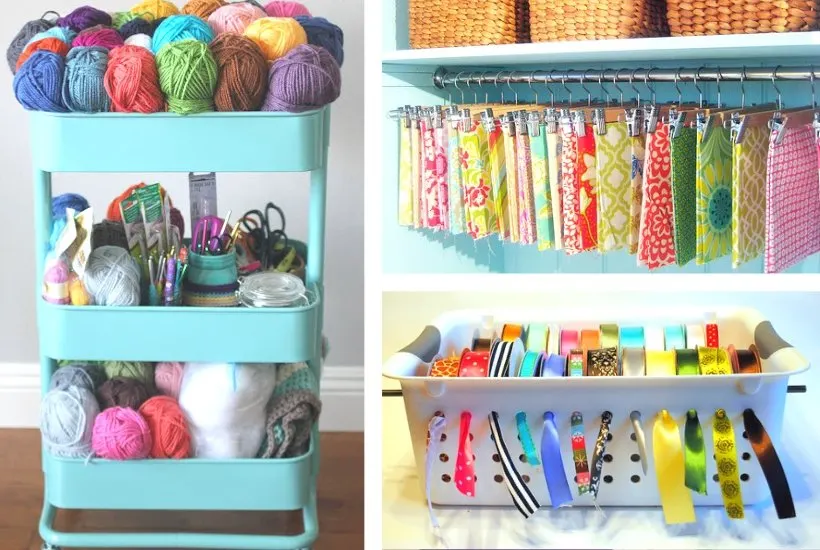
- Utilize a Cart on Wheels
Conveniently move your craft supplies around your space with a cart on wheels. Using this helps you wheel your tools and materials wherever you need them in an instant. There are many carts on wheels available in stores these days, so you can choose the best color or style that suits your preference. In addition, its functionality gives you ample storage space since it includes a series of hooks where you can place other storage for small stuff.
- Invest in Storage That Can Act as a Piece of Furniture as Well
When you are looking for more than just a place to store all your craft supplies, purchase storage with a table or a cabinet with various drawers. Simply pick one that has modular shelves or various compartments so you can set up the space for all your needs. You can also save money from this, for it can double as furniture, too. There’s no need to buy extra storage because you can use the shelves or compartments to put all your arts and crafts materials.
- Go For Containers
Instead of buying big pieces for your craft supplies, you can opt for right-sized containers. Having a good set of containers helps you organize stuff and place them in shelves, wall-mounted racks, or carts. These allow you to segregate all your tools and materials to lessen your materials’ mess. And if you have lots of containers, you can store as much stuff all you want. No need to worry about where to put particular tools and materials, since you have the perfect containers for them.
- Maximize Your Wall Space
You can utilize your wall space to store some of your stuff if you are having trouble with their small area. A wall-mounted storage rack lets you store your craft materials over your workstation or wherever you want. You can also easily reach and grab them whenever you need to use them. You can design your wall space as well to make it more aesthetically pleasing, but with a purpose in mind.
- Use Old Wooden Crates
Create open storage by using old wooden crates. If you have these crates that are just locked up in your attic or storage room, you can repurpose them and use them for your craft supplies. All you have to do is stack some old wooden crates according to your preference then you are good to go. You can design them vertically, horizontally, or both, depending on what you want. These are versatile storage options that will let you create additional shelving for all your art materials.
- Consider Using Pegboards
Pegboards are one of the most popular tools to keep your things organized. They are highly functional, so take advantage by hanging them on your wall. Paint it in your favorite color or match it with your room’s theme, to make your pegboard nice and aesthetic. You can also frame it and use smaller frames to divide sections of your craft supplies.
Takeaway
Organizing craft supplies at home will always be fun and the perfect activity to bond with your family. There are countless ways to sort out your tools and materials, like the things mentioned above. A neat and organized space brings joy and satisfaction after a day of making art masterpieces.
Misplacing art materials can be tedious and challenging, so save yourself from that and start getting a storage unit for them too. If you are worried about your small space, these things can also provide you with useful options to maximize your space. Thus, keep these things in mind and make your craft space clean and well-organized. If you want to know more about interior design, visit Storables.com today!
-

-
-

-

-

-

